

Is your hair not growing as fast as you’d like? Or perhaps it feels lackluster, no matter what products you try? Well, what if I told you there’s something simple—or let’s say, simply enjoyable—you can do at home to potentially boost hair growth? Yes, you guessed it: scalp massages. They aren’t just a luxury, they’re also a powerhouse for healthy hair when done right. So, pull up a comfy chair and maybe grab your scalp hair brush, because you’re about to learn all the tips and tricks to master the art of scalp massages, DIY style.
The Wonders of Scalp Massages
Let’s dig into why this ritual can work wonders. Many people underestimate the impact that a good massage can have. It’s not just about relaxation (though that’s a huge perk, too). Scalp massages stimulate blood circulation in your scalp. More blood flow can mean more nutrients and oxygen delivered to your ant to get ths, encouraging them to grow stronger and faster. Trust me, you want to get those follicles fired up!
Why Blood Flow Matters
Blood carries oxygen and nutrients to every cell in our bodies, including our hair follicles. The better the circulation, the better fed your follicles are. Picture it as providing a feast for your hair—scalp massage equals happy, well-fed hair follicles ready to work at their best.
How to Prepare for Your DIY Scalp Massage
Alright, let’s set the stage first. Preparing sets the state of mind, creating a serene environment even if you’re likely just sitting in your bedroom squeezing in ten minutes of peace.
Gather Your Essentials

- Scalp Hair Brush: Preferred for a gentle, invigorating approach.
- Essential Oils: Think rosemary, peppermint, or lavender. Pro tip: these can enhance your massage session, promoting relaxation and possibly more blood flow.
- Carrier Oils: Jojoba or coconut oil are great mixers—add a few drops of your chosen essential oil to them.
- A Quiet Space: Create a calming environment, whether it’s dim lighting, a favorite podcast, or candle-lit ambiance.
Combining Oils for Maximum Effect
Mix five drops of essential oil in two tablespoons of your carrier oil. Essential oils like rosemary not only smell divine but may also stimulate hair growth on their own. Yes, it’s an aural and olfactory journey too!
Performing the Perfect Scalp Massage
Step 1: Setting the Scene
You’re armed with blissful oils and a mindset ready to enrich your locks. Let’s dig in. First, place a small amount of oil blend onto your fingertips. Trust me on this—oil not only amplifies movements but also nourishes your scalp.
Step 2: The Circular Movement
Using your fingertips, start at your hairline and massage in small, gentle circles. Work slowly, allowing the oil to absorb into the scalp. Imagine delicately kneading bread dough; it’s all about that soft, sustained movement. Let your scalp hair brush come into play here once you’re comfortable, going from front to back in broad, sweeping motions. Its bristles will boost that blood circulation even further.
Step 3: Harnessing the Hair Growth Massage
Remember those hair roots we’re trying to stimulate? Focus on different areas—your temples, the nape of your neck—it’s a warm-up exercise for all your follicles. Sometimes, alternating the pressure can help to really work the scalp. Don’t pressure yourself, though, literally or figuratively. Remember, this should feel great!
Step 4: Rinse or Relax

You can leave the oils in for an added treatment, or rinse them out after about 20 minutes—your call. If you skip washing, the scent will linger for an aromatherapy effect that’ll ride with you into the day.
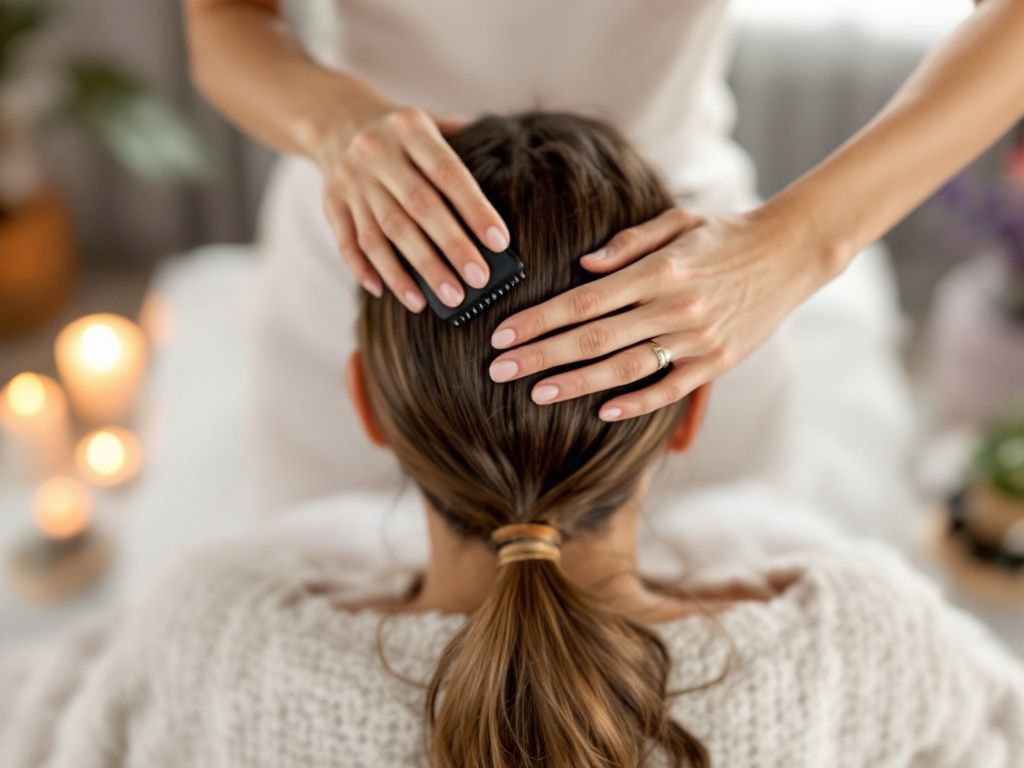
The Role of the Scalp Hair Brush
Let’s talk specifically about our trusty scalp hair brush buddy. It’s more than just a detangling genius. This tool simulates the effect of fingers, thanks to its soft pins or bristles designed to simulate the soothing action of a steely massage therapist’s hands.
>> Using a scalp hair brush once or twice a week, outside of oil massages, can be a game-changer. During regular shampooing, it helps lift dirt, debris, and leftover product, ensuring a cleaner, more invigorated scalp.
Daily Routine for Better Results
I know you’ve got routines packed to bursting already, but adding just five minutes might make a difference. A morning routine incorporating scalp brushing can dissolve stress you didn’t even know you were carrying.
Morning Brushing
**How to**: – Use your scalp hair brush, focusing on all areas of your scalp evenly. – Avoid going too vigorously; gentle stimulation is key.
Trust me, your follicles will appreciate the good morning wake-up.

Common Missteps to Dodge
Here’s where a first-timer might bulge off-track—but don’t let it worry you. Remember these nibbles of advice:
- Too Rough: Gentle does it, even if you’re itching or feeling tense.
- Forget Everything Else: Hydration, diet, and stress level all play parts. Massages are fab alongside a holistic approach.
- Overdoing it: Every day might be too much. Stick to two or three sessions a week.
Wrapping It Up
Look, hair growth won’t happen overnight; hair usually grows about half an inch per month. Still, making DIY scalp massages part of your self-care routine surely tips the odds in your favor, alongside keeping stress low and happiness high.
Competing don’ts include rough handling, just as not stockpiling on every “miracle product.” Nature requires awareness and a humble bit of patience.
So next time you’re in front of the TV or settling down with a book, think about grabbing a few minutes before to indulge in this source of both serenity and encouragement. Soon you’ll find it’s something you honestly look forward to, not only for your hair but for the delightful intermission it offers to your day.

A Question You’re Bound to Have
**”How soon?”**, you ask. Consistency is your pal. A few weeks of regular massages, and not only could your hair growth pick up, but the strands themselves may become healthier and shinier. Sprinkle these moments liberally throughout your busy week—you’ve got this, and, well, your scalp hair brush is cheering you on!
That’s it—give this DIY journey a shot and weave it into your routine. I’ll say, don’t be surprised if your hair appreciation blossoms into something profound, and you’ll soon understand why. Here’s to healthier hair and a refreshed state of mind!
Frequently Asked Questions
How often should I wash my face mask to prevent maskne?
To prevent maskne, it is crucial to wash your face mask regularly. For fabric masks, wash them after every use, similar to how you would wash your underwear[2][3][4]. Disposable masks should be tossed after each use to prevent the buildup of bacteria and other contaminants[3][5>.
What type of skincare products are best for preventing maskne?
For preventing maskne, use skincare products that are oil-free or noncomedogenic. These products, such as gentle cleansers, moisturizers, and sunscreens, help prevent clogged pores and reduce the risk of acne. Look for products containing salicylic acid or benzoyl peroxide for their acne-fighting properties[1][3][4>.
How can I reduce friction and irritation caused by wearing a face mask?
To reduce friction and irritation, choose a mask that fits well and is made from breathable fabrics like cotton or bamboo. Loosen the mask straps, use pads under the straps, or consider a headband-style mask to minimize friction. Taking brief breaks to remove the mask and allow your skin to breathe can also help[2][3][5>.
What are some additional tips to prevent maskne while wearing a face mask?
In addition to regular mask washing and using the right skincare products, avoid touching your face, skip makeup or use noncomedogenic makeup, and moisturize your skin to keep it hydrated. Also, limit the use of active ingredients like retinol or benzoyl peroxide during the day when wearing a mask, and consider using a topical antimicrobial cream to prevent bacterial buildup[1][3][4>.
References
Leave a Reply